Showing posts with label Tutorial. Show all posts
Showing posts with label Tutorial. Show all posts
Wednesday, April 13, 2011
 12:23 PM |
  Posted by
justcreations1
Posted by
justcreations1
Create a Flower Decoration
(Using Papers/Shapes & the Spherize Filter)
You can download the supplies used in this tutorial here!
They are in PSD, PNG and PSP Format. (CU4CU OK)
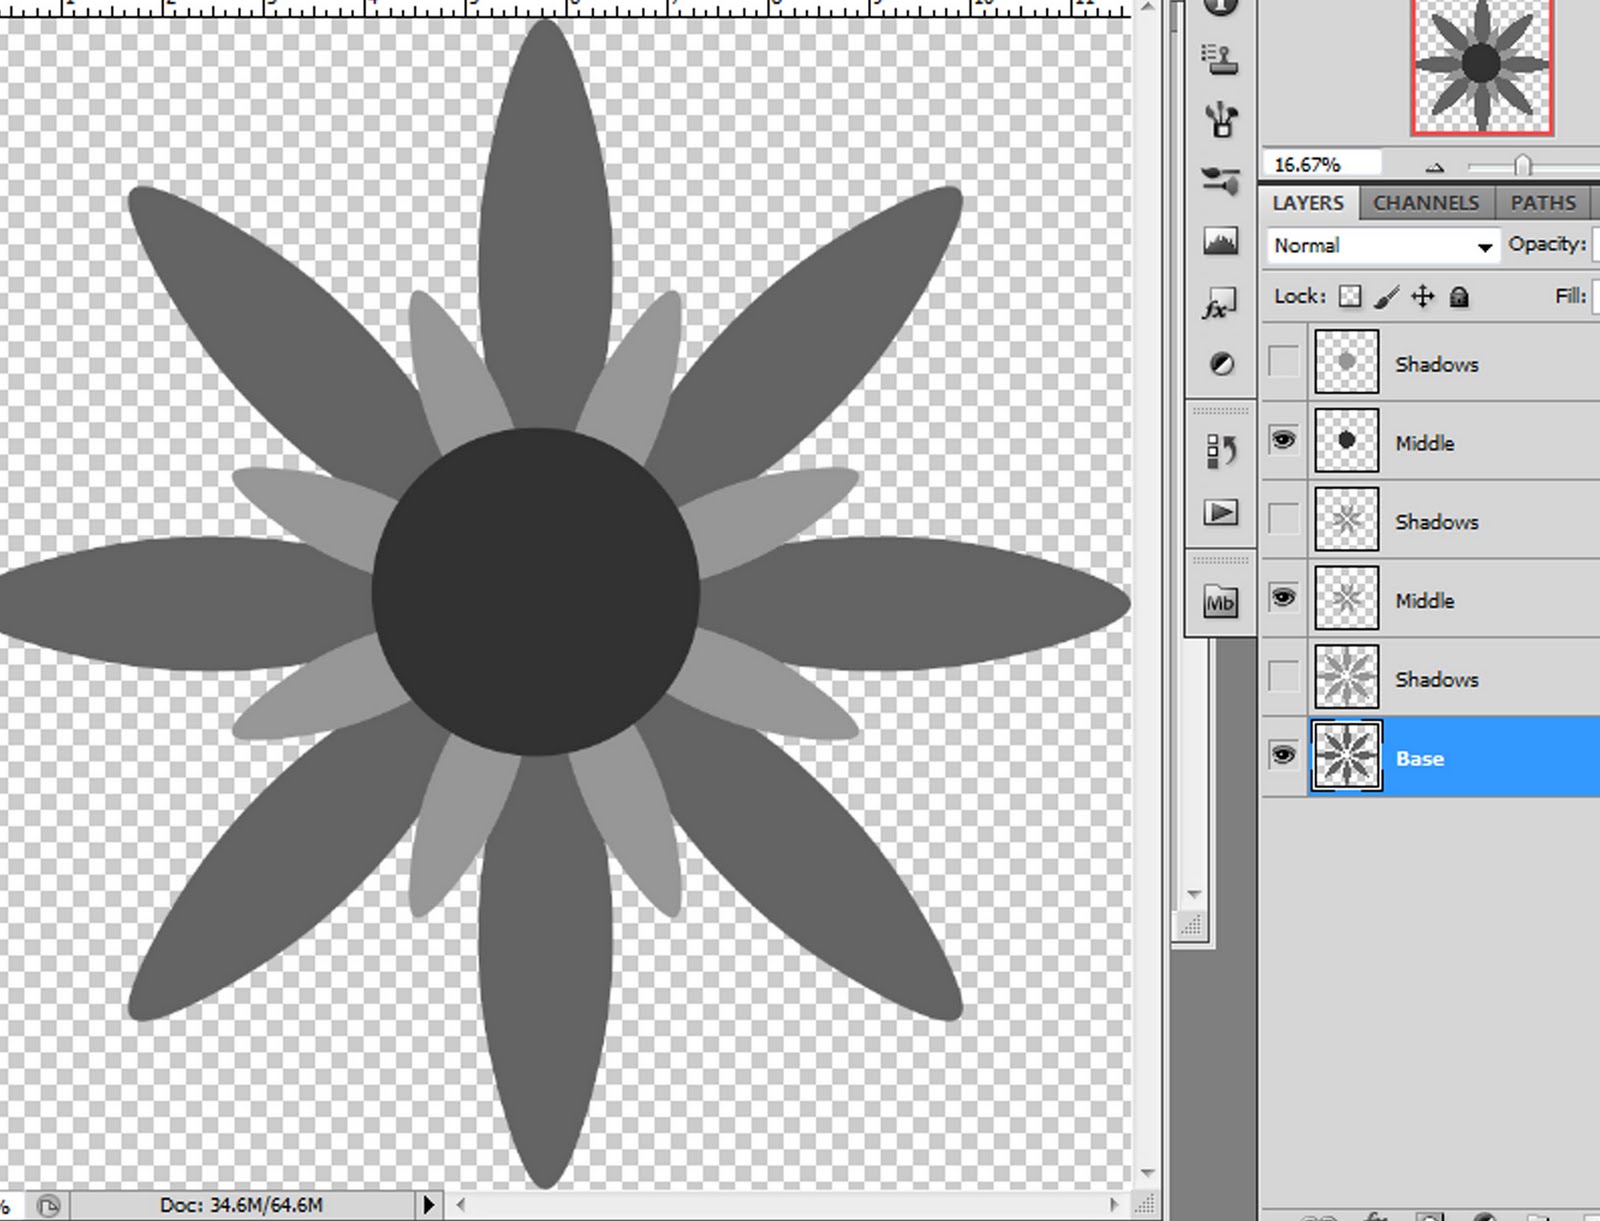
Open up the "JC_FlowerBase1_Template.PSD"
Highlight the bottom layer "Base"

Open the "JC_HeartsBG.jpg" that came with this tutorial.
Drag it over to the "JC_FlowerBase1" document.
(Make sure that it's on the layer right above the "Base"

Turn off the new Layer (1)
Make sure you're on this layer (1)
While holding down the CTRL key on your keyboard click on the layer named "Base"
You should see the active layer (marching ants) (2).
While holding down the CTRL key on your keyboard press the J Key (CTRL+J)
This duplicates the active areas only.

Here is what it looks like so far.
Now we're going to use the Spherize filter.

On the Top Menu Bar click on Filter.
Then click on Blur and then Gaussian Blur.

Use the settings I have
Amount: 100%
Mode: Normal
Click OK.

Turn off this layer (1)
Now while holding down the CTRL key on your Keyboard click on the "Base" layer to activate it (Marching Ants - 2)
Now we need to duplicate it (CTRL+J)

Rename your new layer to "Base Overlay" (1)
Highlight the layers you have now turned off (2) and delete these.
(right mouse click - delete)

Now we're going to use the Blend Options to give it some shading.
Since there are two colors being used we don't want to do this on the original Overlay we created.
So, turn on the Shadows layer I have in the file (I have it off so you can see what you're doing)
Basically all I did to make this layer was duplicate the Base layer.
In the upper right corner you'll see the "Fill" slider. Turn this to 0.
Now double click on the layer thumbnail to bring up the Blend Options (Arrow)
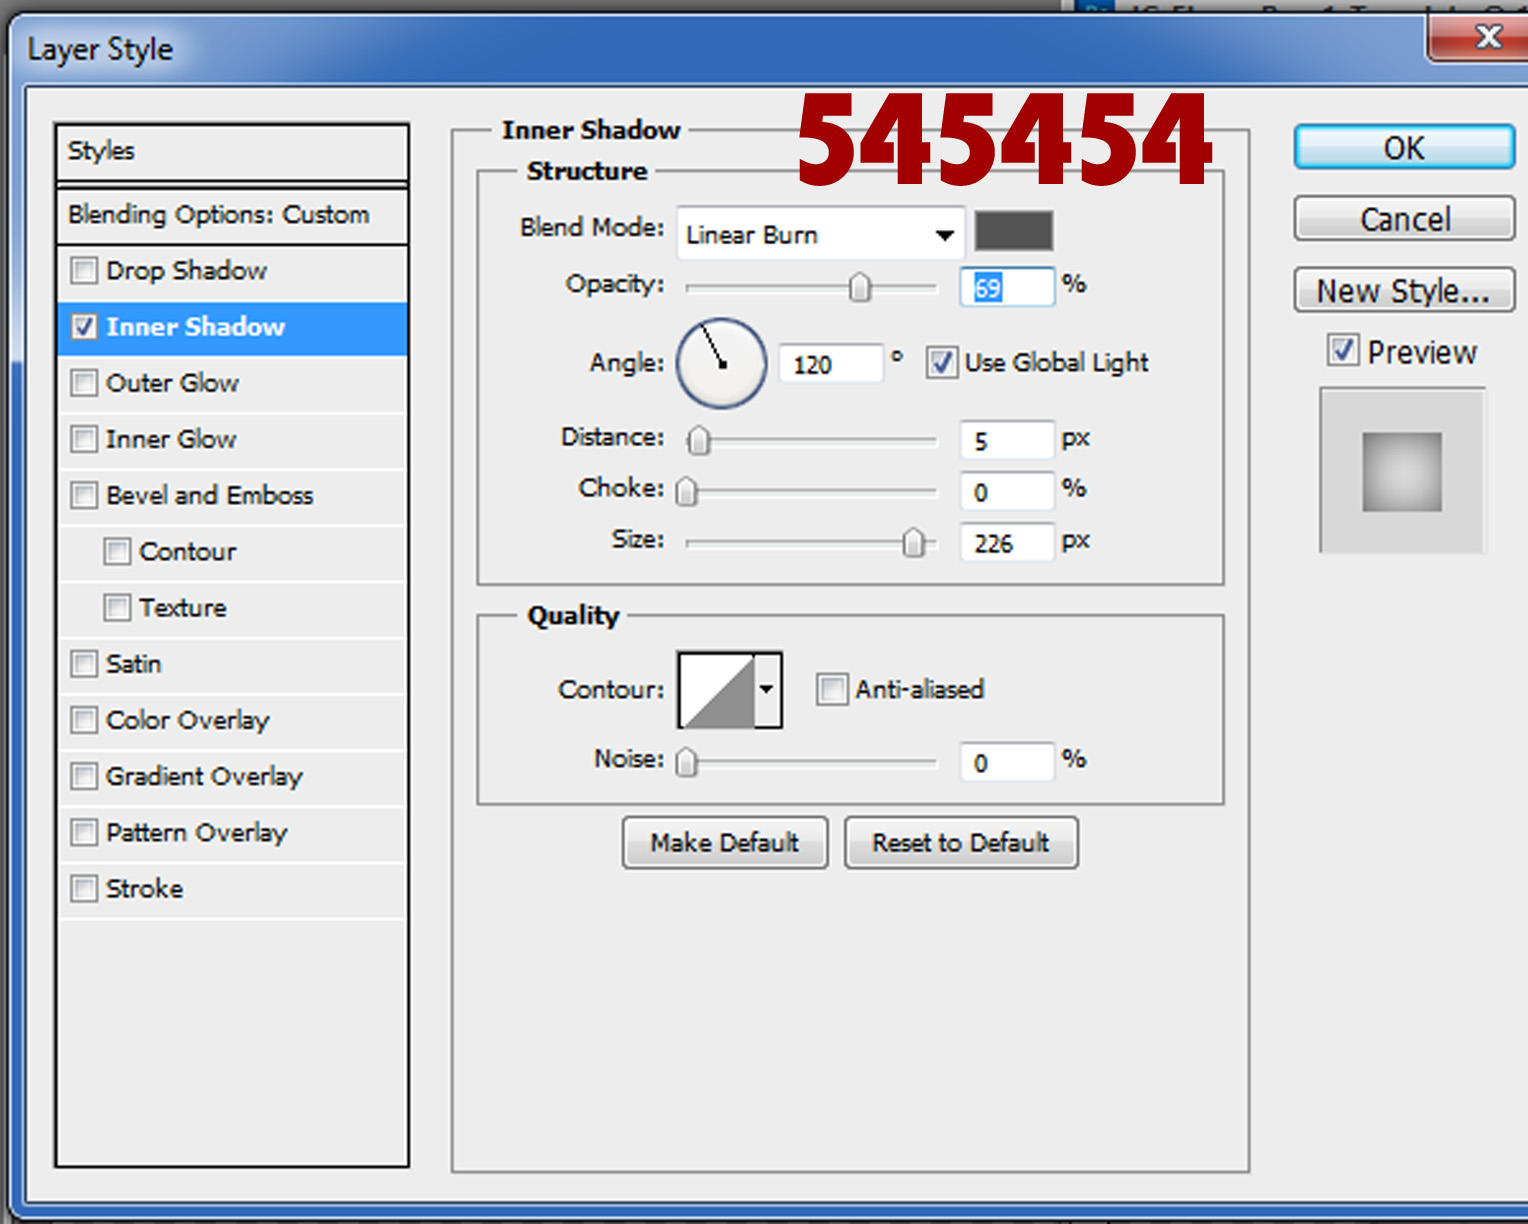
Go to the Inner Shadow Tab and choose the Color #545454
Change the Blend Mode to "Linear Burn"
Use these settings
Opacity: 69%
Angle: 120 (Check "Use Global Light")
Distance: 5
Choke: 0
Size: 226
We're not done yet...

Now go to the Inner Shadow Tab.
Change the Blend Mode to Linear Burn
Use the Color #545454
and use these settings
Opacity: 20%
Noise: 0
Source: Edge
Choke: 0
Size: 174
Now click OK

Now we want to add some stripes to the "Middle" layer.
Choose the Rectangle Tool (1)
Use the settings I have here (2)
Choose a color you want the stripes to be.

Draw out a stripe (1)
Duplicate it 6 more times and space them out as I have here (1)
Don't worry about making them evenly spaced. We'll fix that right now.
Highlight all the stripes in your layers pallet (2)
You'll need to change your curser from the "Shape" tool to the Normal tool to do this next stop.
At the top you'll see the align menu (Window - Align) if you don't.
Choose the one that says "Distribute Vertical".
Now merge all the Stripe layers (CTRL+E)

Now we're going to Spherize again.
Go to Filter - Spherize and use the same settings you did above.

Now we want to Transform the stripes to make them almost the same size as the Middle layer.
CTRL+T to transform. Bring the stripes in like I have.
Click Enter to apply the Transform when you're done.

Turn off the stripes (1)
Now while holding down your CTRL key on your keyboard click on the Middle Layer (2)
Now we need to duplicate (CTRL+J).

Rename this layer to Stripes and Delete the layer beneath.

Now we need to color the Middle. Double click on the Layer thumbnail.

Go to the Color Overlay tab and choose a color you like.
Click OK when you're done.

Now turn on the Shadow layer that is above the Middle Layer (2)
Do a Right Mouse Click on the Shadlow layer we fixed below (1)
Choose "Copy Layer Style"
Now go to the Shadow layer we just turned on (2)
Do a Right Mouse Click and choose "Paste Layer Style"

Here it is so far.
Now we're going to add some dots to the Middle Circle.

Choose the Elipse Tool and choose a color you want to use.

Draw out a circle (holding down the Shift while drawing the circle will make it a perfect circle)
Duplicate this many times as I have (1) and space them out as I have (1)
Don't worry about making them even... We'll do that next
Highlight all the dots in the layers pallet (2)
Change your curser from the Shapes tool to the Normal tool.
Now you should see the Align tools at the top. Choose the "Distribute Horizontal".
Now merge all the dots (CTRL+E) while they are still highlighted.

Duplicate the dots and bring down below and set them so they are like mine.

Do this several more times until you get them like I have here. (1)
Highlight all the dots (2) and merge (CTRL+E)

Now we want to Spherize the dots.
Go to Filter - Spherize and use the same settings we did previously.

Use the CTRL+T to shrink the dots in so they are a bit larger then the Middle Dot.
Hit Enter when you're done.

Turn off this layer (2)
While holding down the CTRL key on your keyboard click on the Middle Dot (1) to activate the layer.
Now duplicate "CTRL+J"

Here it is so far.
Now we want to color the Middle Dot.
Click on the Layer Thumbnail to bring up the Blend Options

Go to the Color Overlay tab and choose a color you like.
Click OK when you're done.

I decided to change the dots to a different color so I used the same steps above and changed the Color Overlay of the dots.

Now we need to apply the shading.
Go to the last Shadow we did (1) and do a Right Mouse click and choose "Copy Layer Style"
Now go to the Shadow layer for the Middle Dot (2). Turn it on and do a Right Mouse Click and Choose "Paste Layer Style"

Here is the finished product.
I would love to see what you create with this.
If you'd like to have your finished producted featured with this tutorial please email me a copy of the finished product!
Thank you,
Justie
Just Creations

Here is the supplies for this tutorial, along with 2 examples I made using this tutorial.
You can download this CU4CU freebie here!
 Labels:

Tuesday, December 21, 2010
How to Create Glass for a Snowglobe - Photoshop Tutorial
For this tutorial I'm going to use my Snowglobe Template (for sale in all my stores - listed to the right)
My image is 3600x3600 300 DPI so if your image doesn't match mine you'll need to adjust the settings to suit your image.
My image is 3600x3600 300 DPI so if your image doesn't match mine you'll need to adjust the settings to suit your image.
Open Your Image

First we'll want to add a highlight on the globe on the layer right above the globe.

Go to your Shapes toolbar and choose the Custom Shapes

Choose the "Raindrop" shape and make sure that your settings are the same as what I show here.
(Make sure to use White as your shape color)

Draw the shape out so that it's about 1/4 the size of the globe.

While holding down the CTRL key hit the T (Transform).
Do a right mouse click over the top of the new shape and choose "Rotate 90 Clockwise"
Hit Enter.

Do another CTRL+T, this time choose the Warp tool (see arrow on above image).

From the drop down list choose "Arc" Leave the settings as Photoshop has them. Hit Enter.

Do the CTRL+T and Rotate your highlight around until it looks like I have mine.

At the top of your menu you should see a menu tab that says "Filter"
Click on this and from the dropdown menu choose "Blur" and then "Gaussian Blur"

This menu will appear. Just click OK.

Add a blur to your highlight until it looks like mine.
I have used a Radius of 28.0

Rename your Highlight layer to Globe Highlight (1).
Choose "Soft Light" from your Blend Modes (2)
and lower the opacity to 38% (3).
(Or until your highlight barely shows)

Now go back to your Globe layer (1)
and lower the Fill to 0 (2).
You'll notice that your globe disappears. (3)
That's ok, it will be back in the next couple of steps.

Now double click on your Globe Layer Thumbnail to bring up the Blending Options.

First go to "Inner Shadow" and choose Black as your color. Use the same basic settings I have here (depending on the size of your image).
I have the Opacity at 75%
Angle at 120
Use Global Light
Distance at 5
Choke at 0
Size at 250.
I have the Opacity at 75%
Angle at 120
Use Global Light
Distance at 5
Choke at 0
Size at 250.

Now go to the Inner Glow and change the Blend Mode to "Multiply" Make your color Black and use the settings I have.
Opacity 45%
Noise 0
Technique: Precise
Source: Edge
Choke 0
Size 250
Opacity 45%
Noise 0
Technique: Precise
Source: Edge
Choke 0
Size 250

That's it...
Here's the final image on a colored background.
If you have any questions or comments please feel free to email me at justcreations@ymail.com
Subscribe to:
Posts (Atom)
Proud Designer for


Grab My Blinkie

 >
>
