Wednesday, January 12, 2011
Coloring & Shading a Lineart (scanned) drawing - Photoshop Free tutorial
This tutorial was written for Dora Workman who wanted to know how to shade a scanned drawing.
I wanted to get this tutorial out as quickly as possible for her so I found a lineart that I had downloaded free off the Internet. I am not sure who to give credit to for this drawing though. If you know where it came from I would appreciate a note so I can give proper credit.
First open your scanned image in Photoshop. (Note: You'll need to adjust my settings below depending on the size of your image. The image I'm using is not a large one).
Usually your scanned image will be scanned in as a JPG and you'll want to change this. To do this simplly follow these next two steps.
After you've opened your image go to the Layers Pallet and double click on the image thumbnail (1)
This box will pop up. Click OK
Now go to the top menu bar and click on Image, Adjustments and Brightness & Contrast
Change your Brightness and Contrast until the lines are nice and dark.
Now click on the Magic Wand and use the settings I have here.
Tolerance: 32
Anti-alias: Checked
Contiguous: Checked
Click on all the areas that you do not want to be colored. (background) and then either hit the Delete Key or use the CTRL+X.
Now you'll notice how the background area is gone so you don't have to worry about it.
Now Highlight Layer 0 (1)
Use the Magic Wand key (using the same settings as in the previous step)
Click on the first item you want to color. (3)
Here I want to do the face.
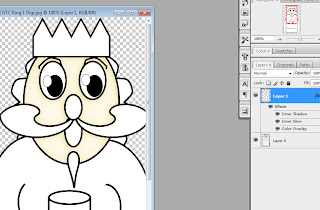
After you've selected the area(s) you want to color hold the CTRL key and do a CTRL+J (Copy to the layer above) (2)
Temporarily turn off the Layer 0 (1) so you can see the newly copied area (2 & 3)
Now double click on the Layer Thumbnail of the newly copied area (2) to bring up the Blening Options.
Go to Color Overlay (1)
Double Click on the Color Swatch (2)
Choose a color you like (3)
See your results so far (4)
Now go to Inner Shadow (1)
Double click on the Color Swatch (2)
Choose a color that's a little darker then the color you used for Color Overlay (3)
Once you've chosen the color you want use the settings I have here (except make sure that your settings work for the size of your image)
Blending Mode: Multiply (2)
Distance: (Depending on the size of your image)
Choke: 0
Size: (Depending on the size of your image)
Check the results so far (4)
Now go to Inner Glow (1)
Change the Blend Mode to Multiply (2)
Use the same color you did for Inner Shadow (3)
Change the distance, size, and Opacity for the size of your image (4)
Here are the results so far.
Now follow these previous steps for each and every element that you want to color.
Note: It's a good idea to change each layers name to match what you're donig. For Layer 1 I'll change the name to Face"
Once you've completed the coloring part of the image it's time to add definition to the lines.
Highlight the original image Layer 0 (1)
Using the Magic Wand (with the same settings we used in the previous steps)
carefully click on the black lines of the image (you'll want to zoom in close for this) (2)
Once you're satisfied that you have the lines, while holding down the CTRL key hit the J to duplicate the lines.
Rename this new layer to Lines and drag it to the top of the Layers Pallet
Now Highlight the Lines Thumbnail in the Layers Pallet(1) and while holding down the CTRL Key click on the layer you want to duplicate the lines for. (In this case it's the Nose) (2)
Now click on the Select Menu at the top and choose Modify and Expand
I'm using 5 but you'll want to play with this setting until you get it just outside of the lines (it depends on the size of your image)
Do this for each and every layer you've colored. Make sure to rename each of these so you'll remember what the lines are for. I have renamed them to the layers name with the word Lines after it. (Ex: I used Nose Lines for the colored layer Nose)
Now go to the Blending Mode and go to Color overlay and choose Black.
That's it... This is the finished item.
If you have any suggestions, questions or comments please email me at justcreations@ymail.com
If you would like to see a tutorial please email me with the tutorial you'd like and if I can help I would be more then happy to put one up.
Sunday, January 9, 2011
Making Lights - Photoshop Tutorial
For this tutorial I'm using the Marquee Template from my "Hollywood Starter Kit" on sale in my stores listed on the right.
To make lights look like they are lit up (1)
Double click onthe layers icon in the layers pallet (2)
Go to Color Overlay (1)
Use "Normal" for the Blending Mode and double click on the color swatch (2)
Choose ABB5b7
(I chose this color simply because I want the lights to appear like white lights.
If you want another color just alter the colors to what you want throughout this tutorial)
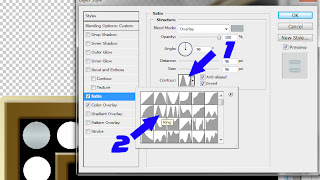
Now go to the Satin Tab. (1)
Make sure the Blending Mode is set to Overlay and double click on the Color Swatch (2)
Choose the same color you chose in the previous step (3)

Use the settings I have here.
Opacity: 100%
Angle 90
Distance: 96
Size: 96
Check both the Anti-aliased and Invert boxes.
Choose the "Ring" Contour (2)
Now go to the Bevel and Emboss tab and use the settings I have.
Style: Inner Bevel
Technique: Smooth
Depth: 100
Direction: Up
Size: 57
Soften: 4
Angle: 120
Altitude: 67
Check the Anti-aliased box
Highlight Mode: Screen (White)
Opacity: 100
Shadow Mode: Overlay (use the same color as you did in the color overlay)
Opacity: 100
Now go to the Inner Glow tab. (1)
Choose "Multiply" for the Blend Mode (2)
Double click on the Color Swatch (3)
Choose the same color you did for the color overlay (4)
Now choose these settings
Opacity: 50
Technique: Softer
Source: Edge
Choke: 0
Size: 20
Range: 50
Jitter: 0
Now go to Outer Glow (1)
Choose "Screen" for the Blending Mode (2)
Choose a lighter color of the one you chose in the color overlay.
HOWEVER, if you're using white like I am then you want to choose a pale yellow. (3)
Technique: Softer
Spread: 0
Size: 27 (4)
NOTE: You want to make sure that your size (4) is not so large that it spills over the edge of your image (5). You just want this to be large enough to notice outside of the lightbulb.
Now go to Inner Shadow and choose these settings
Blend Mode: Overlay
(Use the same color as you did in Color Overlay)
Opacity: 100
Angle: 120
Distance: 27
Choke: 23
Size: 50
End Result!
If you have any questions or comments please email me at justcreations@ymail.com
Subscribe to:
Comments (Atom)
Questions or Suggestions?
If you have any suggestions or questions about my tutorials please send me an E-Mail justcreations@ymail.com
Thank you!
Thank you!
Blog Archive
Contributors
Powered by Blogger.
Labels
- Banner (1)
- Burn (1)
- Cheat Sheets; Highlights; Shading (1)
- Designer Preview; Paper Preview (1)
- Dodge (1)
- Emboss (1)
- Extraction 1 (1)
- Extraction; Shading (1)
- Freebie (4)
- Freebie; Gold; Tutorial (1)
- Glass (1)
- Glossy Button; Highlight (1)
- Glossy Frame; 3D Shading (1)
- Highlight (1)
- Highlights; Shading (1)
- Lights; Tutorial (1)
- Lineart; Recolor; Shading; Coloring Element (2)
- Lineart; Recolor; Shading; Recolor; Shading; Coloring Element (1)
- Recolor; Shading; Coloring Element (3)
- Shading (2)
- Shapes (1)
- Spherize; Shading (1)
- Swirls (1)
- Tutorial (6)


