Create a Paper Bolt Preview
(The template I created using this templaet will be at the bottom for you as a Freebie)
Create a new image 3600x3600 300 DPI.
Open the papers you want to use.
I am using 6 Papers for this tutorial.
Copy all the papers into the new image.
Select the Marquee Tool (as shown by the arrow)
Make sure you have make the Ruler viewed on your image.
Since my paper is 12x12 and I have 6 papers I want to create a selection that's 2" so that they will all be evenly split.
(Note: If I was creating 8 Papers I would divide 12 by 8, or if I had 10 papers I would divide 12 by 10, and so forth)
Since my paper is 12x12 and I have 6 papers I want to create a selection that's 2" so that they will all be evenly split.
(Note: If I was creating 8 Papers I would divide 12 by 8, or if I had 10 papers I would divide 12 by 10, and so forth)
While you're Layer 1 (bottom paper) is highlighted (see example) do a CTRL+J (Duplicate)
If you turn off the bottom layer you'll see your newly created paper selection.
We're going to use this as a template for the remaining papers.
Highlight the next paper (1) and while holding down the CTRL key click on the newly created selection (2). Now do a CTRL+J (Duplicate).
Now do this same thing for the remainder of the papers.
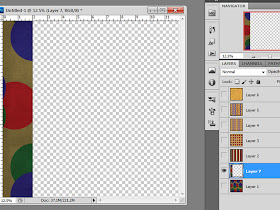
Take the top layer (1) and move it to the right of the screen.
Leave the bottom layer (and the rest of the papers) where they are (2).
Leave the bottom layer (and the rest of the papers) where they are (2).
Let's delete the paper layers so they are not in the way. Whilte holding down the CTRL key click on each of the paper layers (see example).
Do a Right Mouse click over the top of on of the layers in the Layer Pallet and click on Delete Layers.
Do a Right Mouse click over the top of on of the layers in the Layer Pallet and click on Delete Layers.
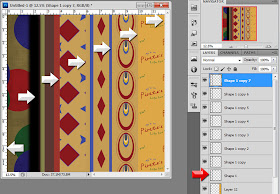
Click on the Bottom layer, now while holding down the SHIFT key click on the Top Layer. This should highlight all the layers. (1)
On the top menu bar choose the "Divide equally Horizontal (2).
On the top menu bar choose the "Divide equally Horizontal (2).
All of the layers are now evenly distributed between the two ends.
Choose the Rectangle Tool.
Draw a thin line from the very bottom to the very top of the image. (Put this right in the middle between two layers as I have done here.
Now go to the top menu bar and choose "Filter" and choose "Blur" and then "Gaussian Blur".
If you haven't Rasterized your layer this will pop up. Just click OK.
Choose the Radius blur of 47.7 and Click OK.
Duplicate this new layer so that you have enough for each paper as well as the ends. (See arrows)
Put the layers so they are inbetween each layer as shown above.
That's it. You now have a bolt of paper.
I would love to see what you do with this tutorial.
Now for the Freebie...
Here is the Template in PSD, PSP and PNG format.
You may download and use it CU as you wish.


This looks like another wonderful tutorial, Justie. Thank you so much for sharing your knowledge. When I get the time to actually follow along, I'll let you know if I have questions (if that's ok). Thanks again!
ReplyDeletethis is great.Thank you so much!
ReplyDeleteMarilyng
It's great Connie. Anytime...
ReplyDeleteThis is sooo very awesome!! Thank you!
ReplyDeleteKyla Kreates
Thank you!
ReplyDelete