Wednesday, November 30, 2011
I have had many comments and request for tutorials on drawing. Most everyone says the same thing, “I don’t think I can draw very well”. Even though I am not the greatest artist, I do enjoy it, and I’ve noticed that the more I practice, the better I get… It’s when I let it sit for a while and don’t continue practicing that I seem to backslide.
I have always been able to doodle but I always wanted to take my ability to the level my older brother was at. He’s always been able to draw deer, elk, etc. perfectly. Though I have never been able to draw like he does, I have learned to further my ability using the method I’m going to show you today. This is the method that my art teacher used to teach me. It takes practice to get the hang of this, but if you're like me you'll find that it's well worth it to learn this method.
My art teacher explained that most people will look at the picture they want to draw and feel overwhelmed. They can’t seem to break it down in steps. So, he showed us the “Grid” method. If you use this you’ll soon find out that you won’t have to use the grid anymore. You’ll be able to look at a picture and break it down into easy steps (grids). I haven’t actually used real grids in years, though I still show it when I teach. I do however still break everything down as if it had an imaginary grid over it.
First thing first… Download my premade grids here. (They are in all colors and are 3600x3600 300dpi). Since, I’m going to show you how to draw an apple basket, here’s the actual picture I took so you can follow along. (NOTE: I have done photography for many years, so I have many props and images that can be used for this… if you’re looking for something please send me an email and I’ll see if I have it. I can’t promise I do, but if I do I’m more than happy to email it to you)
Create a new image (3600x3600 300 dpi). Pull the apple basket image into the new image (the reason for this is because the apple basket is a picture I took and its 72dpi and you’ll want to make sure that the grid is in the same dimensions as the image you’re working on. Now drag over the Grid you downloaded. For this one I’m using the blue grid. The reason is because it’s an opposite color of the image so you’ll be able to see it.

Now zoom into 100% on both the image with the basket and the image you’re working on. Normally I use the Wacom Cintiqu tablet to draw with (if you ever get the chance to get one of these it’s well worth the money) but for this tutorial we’re going to simply use the Pen tool (1).
So, what we’re going to do is take each little square and draw just what is in each square. So, I started with square 2 and drew it using the pen tool (3). I then moved to the square just above 2 and 3 and drew it. The smartest thing to do here is to draw each section on its own layer. That way if you make a mistake you can simply delete that layer and redraw it.
For the sake of length I’m not going to show you each step I drew. It would take up too many pages and time. I will try to do another tutorial later showing this method with something a bit easier to do.


Choose the Custom Shape Tool (1) and use the same color (2) as the section you’re working with. Carefully add a shape that is just large enough to cover the empty pixels.

The next important step is to shade. By shading your drawing or element you give it life. You can easily make it appear as if it’s 3D by following these next steps. They can take a little time but are well worth the effort.
At the top of your menu bar choose Filter – Blur – Gaussian Blur. Blur it out quite a bit. I used the maximum for this shading. Click OK when you’re done.

Lower the Layer Opacity until you like the look. I used 60% for this one.

After you blur it out you’ll need to clean up the “overspill” Instead of going into this step, please see my prior tutorials which will show you how to get rid of the “overspill” left by using the Gaussian Blur tool.


Lower the opacity on this as well.


Now do this for the middle strap and the back top strap as well.
Here’s what we have so far.

Now we want to shade in-between the slats in order to make the slats appear as if they are a separate part of the basket. Create an empty layer above the inside slat (see arrow). Using the CTRL key click on the layer thumbnails for the two slats that are on top of the slat shown by the arrow. Using the paint bucket fill it with black.

Apply a Gaussian Blur to this and lower the layers opacity so it looks like I have it here. Make sure to get rid of the overspill. (While on the Shading layer hold the CTRL key and click on the bottom slat we mentioned above. At the top menu choose Select – Inverse and again hold the CTRL key down and press X on your keyboard (CUT). This will delete anything outside of the slat. Here’s how it looks so far. Continue to do this for the entire inside slats.

We’re almost done. Now we want to get rid of the empty space around the basket. Choose Image – Trim from the top menu.
 Use these setting and click OK.

I have always been able to doodle but I always wanted to take my ability to the level my older brother was at. He’s always been able to draw deer, elk, etc. perfectly. Though I have never been able to draw like he does, I have learned to further my ability using the method I’m going to show you today. This is the method that my art teacher used to teach me. It takes practice to get the hang of this, but if you're like me you'll find that it's well worth it to learn this method.
My art teacher explained that most people will look at the picture they want to draw and feel overwhelmed. They can’t seem to break it down in steps. So, he showed us the “Grid” method. If you use this you’ll soon find out that you won’t have to use the grid anymore. You’ll be able to look at a picture and break it down into easy steps (grids). I haven’t actually used real grids in years, though I still show it when I teach. I do however still break everything down as if it had an imaginary grid over it.
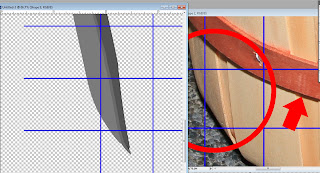
First thing first… Download my premade grids here. (They are in all colors and are 3600x3600 300dpi). Since, I’m going to show you how to draw an apple basket, here’s the actual picture I took so you can follow along. (NOTE: I have done photography for many years, so I have many props and images that can be used for this… if you’re looking for something please send me an email and I’ll see if I have it. I can’t promise I do, but if I do I’m more than happy to email it to you)
Create a new image (3600x3600 300 dpi). Pull the apple basket image into the new image (the reason for this is because the apple basket is a picture I took and its 72dpi and you’ll want to make sure that the grid is in the same dimensions as the image you’re working on. Now drag over the Grid you downloaded. For this one I’m using the blue grid. The reason is because it’s an opposite color of the image so you’ll be able to see it.
Now create a new image again (3600x3600 300dpi). Drag in the grid in this one too. (Here is the example of both images you’re working with)

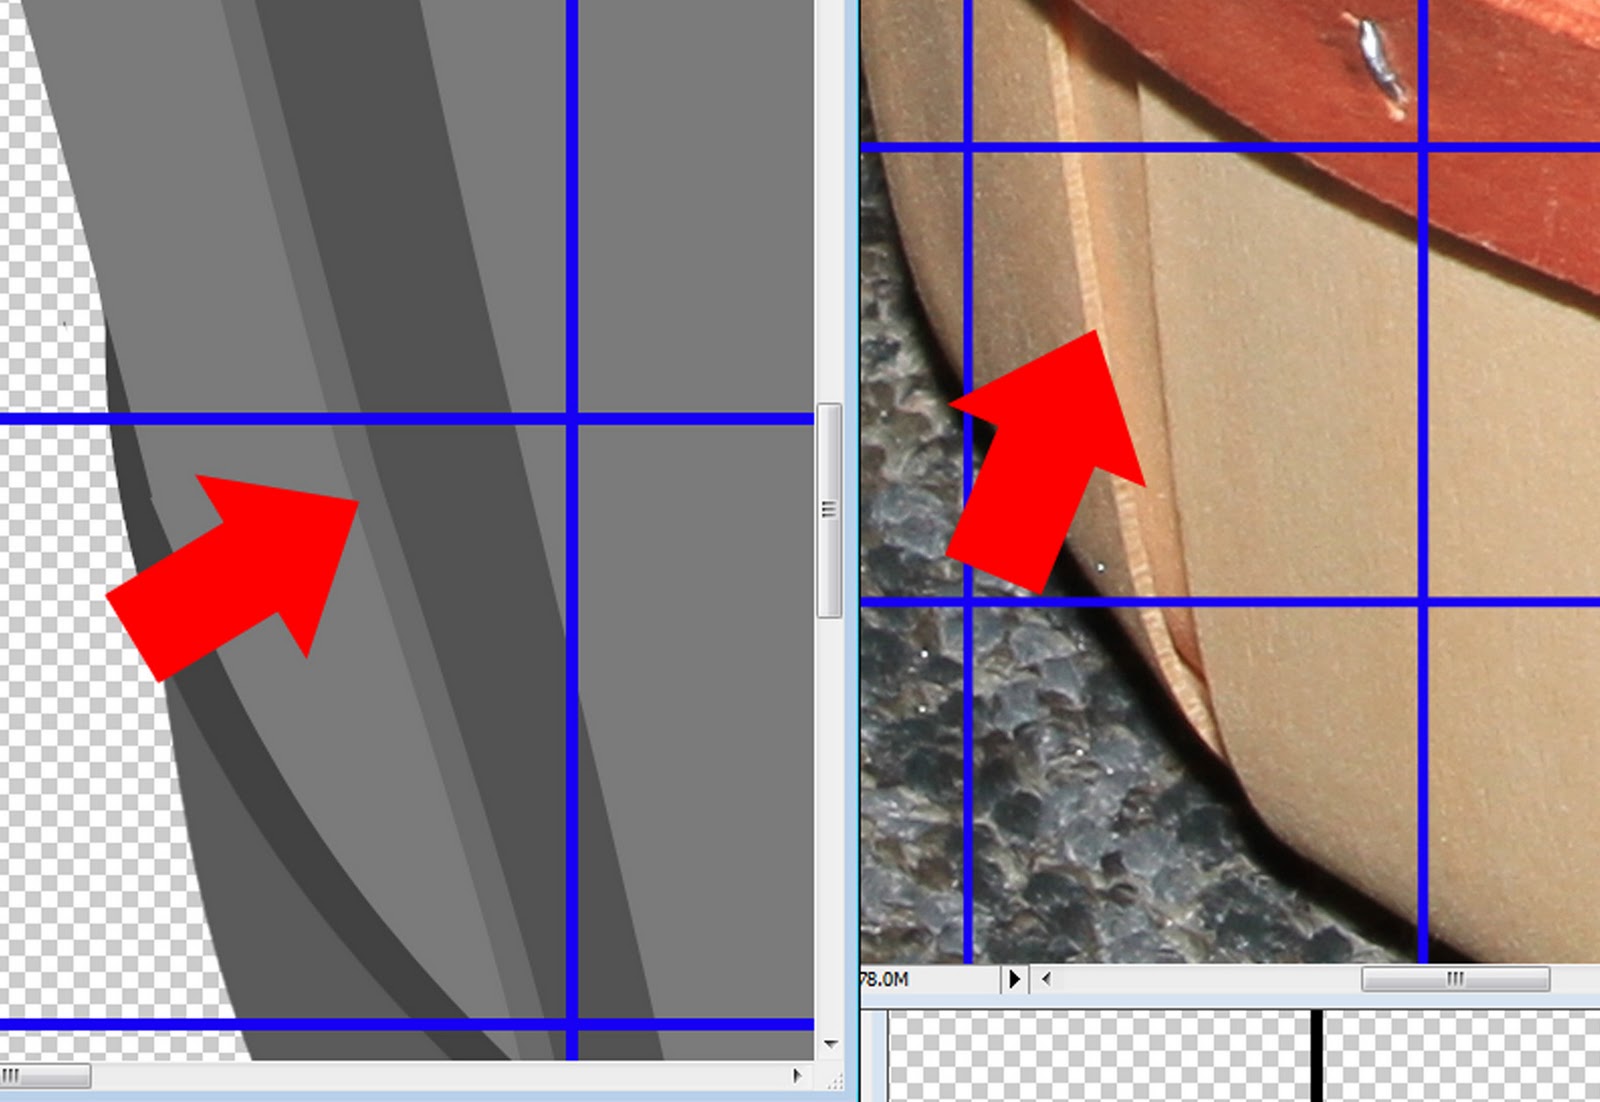
So, what we’re going to do is take each little square and draw just what is in each square. So, I started with square 2 and drew it using the pen tool (3). I then moved to the square just above 2 and 3 and drew it. The smartest thing to do here is to draw each section on its own layer. That way if you make a mistake you can simply delete that layer and redraw it.

Do this for the remainder of the basket. Simply use the grid to draw slowly.

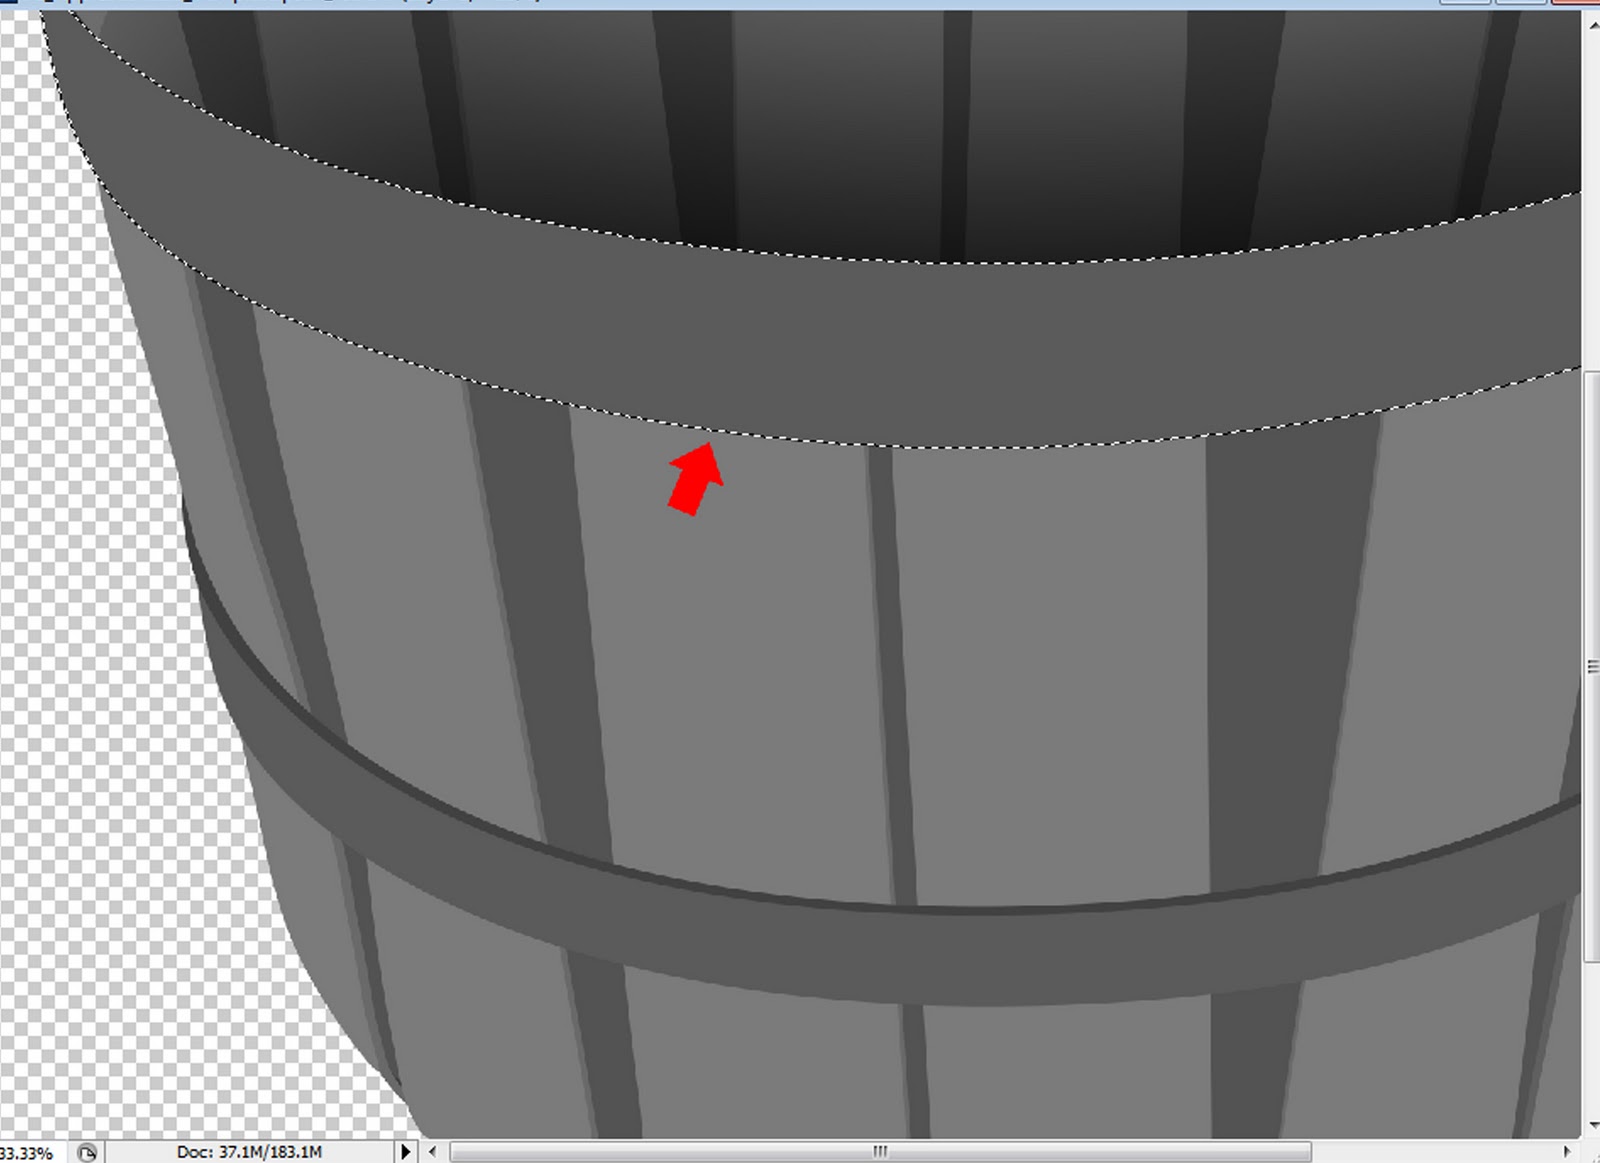
Notice how I drew each section including the 3D side bevel on the slat (as shown in the circle). As I finished each section and was happy with it I merged them together and shaded them in gray (which makes it easier for me to work with, but you can use whatever you want as your colors).
Continue to do this for the entire apple basket (do the straps in the front of the basket (see arrow) and the top of the basket last)For the sake of length I’m not going to show you each step I drew. It would take up too many pages and time. I will try to do another tutorial later showing this method with something a bit easier to do.
While we’re at it, there is one thing people seem to miss on drawings and this (to me at least) is a very important step. The 3D areas. Notice where the arrows are pointing? You see the side lip (3D area). It’s something you should seriously think about when drawing as it can make the difference between a good and a great element or drawing.
When you’re done you need to zoom in to 100% to check for problems. Notice here how there’s empty pixels showing? This is an area we need to clean up.
Choose the Custom Shape Tool (1) and use the same color (2) as the section you’re working with. Carefully add a shape that is just large enough to cover the empty pixels.

The next important step is to shade. By shading your drawing or element you give it life. You can easily make it appear as if it’s 3D by following these next steps. They can take a little time but are well worth the effort.
First find the layers between the front of the basket and the back and inside of the basket. Using your Custom Shape Tool choose black as the color and draw a shape as I have here.

At the top of your menu bar choose Filter – Blur – Gaussian Blur. Blur it out quite a bit. I used the maximum for this shading. Click OK when you’re done.

Lower the Layer Opacity until you like the look. I used 60% for this one.

After you blur it out you’ll need to clean up the “overspill” Instead of going into this step, please see my prior tutorials which will show you how to get rid of the “overspill” left by using the Gaussian Blur tool.
Now we need to shade the straps on the front of the basket.
Create a layer just under the top strap. While holding down the CTRL key on your keyboard click once on the top strap layer thumbnail to activate it (see arrow). Fill this with black.
We don’t want to blur this one out as much as we did the inside shading. Go to Filter – Blur – Gaussian Blur” and choose an amount that will blur it out as I have here. I used 21.4 for this shading.
Lower the opacity on this as well.

This is the overspill I was talking about previously. There are so many ways to get rid of it. See my other tutorials. But, just to show you another way here I’m using the Lasso Tool. I went around the area I didn’t want and clicked delete. Take time to make sure that you have gotten rid of the entire overspill.


Now do this for the middle strap and the back top strap as well.
Here’s what we have so far.

Now we want to shade in-between the slats in order to make the slats appear as if they are a separate part of the basket. Create an empty layer above the inside slat (see arrow). Using the CTRL key click on the layer thumbnails for the two slats that are on top of the slat shown by the arrow. Using the paint bucket fill it with black.

Apply a Gaussian Blur to this and lower the layers opacity so it looks like I have it here. Make sure to get rid of the overspill. (While on the Shading layer hold the CTRL key and click on the bottom slat we mentioned above. At the top menu choose Select – Inverse and again hold the CTRL key down and press X on your keyboard (CUT). This will delete anything outside of the slat. Here’s how it looks so far. Continue to do this for the entire inside slats.

We’re almost done. Now we want to get rid of the empty space around the basket. Choose Image – Trim from the top menu.


I added some staples with a drop shadow and I’m done with the drawing.

Here’s the finished item along with the original image. Notice how using the grid helps you get your image too closely resemble the image?
 If you practice this method you’ll discover how easy it is to draw. It just takes a little practice. You will discover that as you look at something you’ll be able to break it down even without the grid itself.
I would love to see your finished product.

Subscribe to:
Post Comments (Atom)
Proud Designer for


Grab My Blinkie

 >
>

1 comments:
Thankyou for such a detailed tutorial, I am having a go at it right now. Many thanks
Sue
Post a Comment